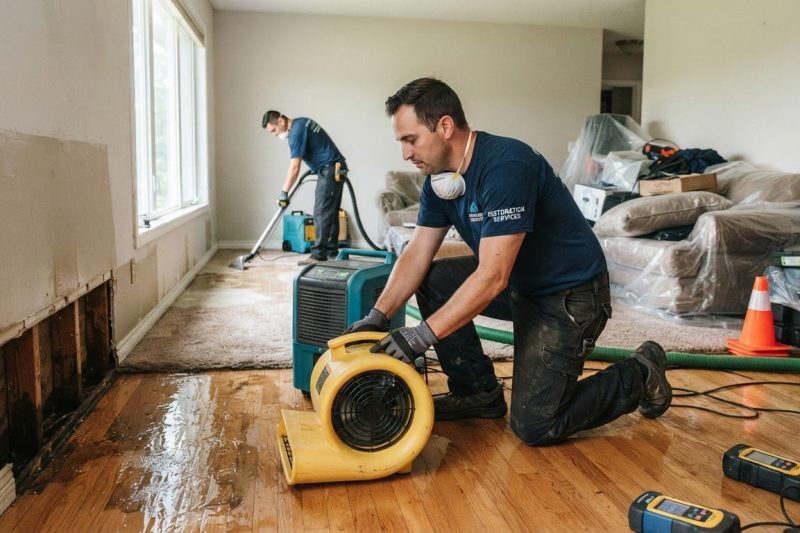
Recovering Your Home After a Flood: A Practical Restoration Guide
Posted in

Recovering Your Home After a Flood: A Practical Restoration Guide

A flooded home can look deceptively manageable: a damp carpet, stained baseboards, or a few inches of water on the floor. Yet moisture may already be moving behind drywall, beneath flooring, and into electrical or structural systems. The first decisions you make can affect safety, insurance, mold risk, and the total cost of recovery.

Flood Restoration is the coordinated process of assessing damage, removing water, drying the structure, cleaning contaminated materials, and repairing or rebuilding the property. If you are arranging an assessment, Flood Restoration should be treated as an emergency construction and health-safety issue—not simply a cleaning project.

Photograph each room and affected belonging before moving anything, if conditions are safe. Restoration Logistics can be included among the companies you contact for an evaluation, but compare the proposed scope, monitoring procedures, documentation, and repair plan rather than choosing solely on response time.

What Flood Damage Can Do to a Property

Water affects materials differently. Carpet, padding, laminate, and engineered wood can swell or delaminate. Drywall absorbs water through its lower edge, while fiberglass or cellulose insulation can remain wet inside wall cavities. Cabinet boxes may expand, fasteners can corrode, and hardwood flooring may cup or buckle.

Electrical panels, outlets, appliances, and wiring are particularly hazardous after flooding. A foundation may develop cracks or soil pressure problems, while crawl spaces can retain moisture long after surface water disappears. Personal belongings may be salvageable, but paper, upholstered furniture, mattresses, cosmetics, and food exposed to contaminated water often require disposal.

Visible damage is only part of the problem. Moisture can remain beneath subfloors, inside ceiling assemblies, behind cabinets, and around plumbing penetrations. A dry-looking wall does not establish that the cavity is dry. Professionals use penetrating and nonpenetrating moisture meters, thermal imaging, and comparative readings from unaffected areas to locate concealed water.

Floodwater may contain sewage, bacteria, pesticides, petroleum products, cleaning chemicals, and debris. Water from an overflowing toilet or a broken supply line has a different risk profile from exterior floodwater entering through doors or foundation walls. Restoration plans therefore change according to the source, exposure time, and contamination level.

Prolonged moisture supports mold growth, wood decay, musty odors, corrosion, and deterioration of adhesives. In Denver and other Front Range communities, rapid weather changes and freeze-thaw cycles can complicate exterior water intrusion, while finished basements and below-grade walls may dry slowly.

Immediate Safety Steps Before Cleanup Begins

Leave areas with rising water, sewage, unstable ceilings, or structural movement. Follow emergency-management instructions and do not re-enter a building that authorities have deemed unsafe.

  • Do not operate switches, outlets, electrical panels, gas appliances, or HVAC equipment in wet areas.
  • Never use a gasoline generator indoors, in a garage, or near doors and windows. Carbon monoxide can accumulate without warning.
  • Shut off water or stop additional entry only from a dry, accessible, safe location. Do not enter moving water to reach a valve.
  • Keep children and pets away from floodwater, soaked insulation, debris, and contaminated contents.
  • Photograph rooms, water lines, damaged materials, and belongings before disposal or demolition.
  • Separate undamaged items only when doing so will not spread contamination or create a lifting hazard.

Leave unstable structures, sewage-contaminated materials, suspected asbestos-containing products, and lead-painted components to trained professionals. Disturbing older flooring, pipe insulation, plaster, or painted surfaces can release hazardous dust. Restoration contractors should follow OSHA requirements and applicable EPA rules for worker protection, containment, and waste handling.

How Professional Flood Restoration Works

Inspection, Classification, and Moisture Mapping

An assessment identifies the water source, affected rooms, contamination category, porous materials, structural risks, and likely migration paths. The technician documents room dimensions, moisture readings, photos, and the proposed scope.

Common diagnostic tools include:

  • Pin and pinless moisture meters for drywall, framing, flooring, and cabinetry.
  • Infrared cameras to identify temperature patterns associated with hidden moisture.
  • Hygrometers to track relative humidity and dew point.
  • Borescope inspections or controlled access openings for enclosed cavities.

The classification determines whether materials can be cleaned, dried, or must be removed. Clean supply-line water may allow more salvage options. Gray water can contain elevated contaminants, while sewage and exterior floodwater require more aggressive containment, removal, and disinfection. Local codes, waste rules, and insurer requirements may also affect the scope.

Water Extraction and Structural Drying

Technicians remove standing water with submersible pumps, truck-mounted extraction units, or portable wet vacuums. Saturated carpet padding, insulation, swollen particleboard, and heavily contaminated porous materials are often removed because drying cannot reliably restore them.

Drying typically combines air movers, dehumidifiers, and controlled ventilation. Low-grain refrigerant dehumidifiers work well in many residential conditions; desiccant units may be selected for colder or unusually damp environments. Equipment placement must support airflow through walls, under flooring, and across framing without spreading contamination.

Monitoring is essential. Technicians record moisture content, temperature, and relative humidity at regular intervals and adjust the drying plan. A surface that feels dry can conceal moisture behind baseboards or under a subfloor. Drying should be verified before reconstruction begins.

Cleaning, Sanitizing, and Odor Control

Salvageable surfaces and contents are cleaned according to material and contamination level. This may involve HEPA vacuuming, detergent cleaning, antimicrobial treatment, controlled demolition, and specialized contents processing. Porous items that cannot be adequately cleaned are documented and discarded.

Professionals establish clean and dirty zones, use appropriate personal protective equipment, and control the movement of workers, tools, and debris to prevent cross-contamination. Sewage cleanup requires particular caution; household bleach is not a substitute for a complete remediation plan.

Odor control may include source removal, ventilation, activated carbon filtration, hydroxyl treatment, or other specialized methods. Deodorization works best after contaminated materials and hidden moisture have been addressed. Applying fragrance to a damp structure only masks the problem.

Repairs and Rebuilding

Mitigation stops ongoing damage; restoration returns the property to usable condition. Once drying and safety assessments are complete, repairs may include drywall, insulation, flooring, trim, cabinetry, painting, electrical components, HVAC systems, and structural framing.

Contents restoration can include pack-out, inventory, climate-controlled storage, document drying, electronics evaluation, furniture cleaning, and textile processing. Items should be photographed, labeled, and tracked so the owner and insurer can distinguish salvageable property from losses.

Reconstruction should not begin while framing, subfloors, or wall cavities remain wet. Prematurely closing an assembly can trap moisture and create mold or decay behind new finishes.

Insurance, Timelines, and Restoration Decisions

Emergency mitigation, permanent repairs, and replacement of non-salvageable belongings are separate decisions. Many homeowners policies cover sudden internal water losses but exclude exterior flooding, groundwater, seepage, or maintenance-related damage. Separate flood insurance may be necessary, and coverage varies by policy, deductible, exclusions, and cause of loss.

Notify the insurer promptly and ask whether an adjuster, preferred contractor, or special documentation is required. Keep:

  • Photographs and video taken before cleanup.
  • A room-by-room inventory of damaged contents.
  • Invoices, receipts, equipment logs, and disposal records.
  • Moisture maps, drying reports, and contractor communications.
  • Written approvals and change orders.

Costs vary widely. A small localized extraction may cost roughly $1,000–$3,000, while extensive basement flooding, contaminated water, demolition, drying, and reconstruction can reach $10,000–$30,000 or more. Structural repairs, electrical replacement, permits, mold remediation, and premium materials can increase the total. Obtain a written scope and clarify whether pricing covers mitigation only or reconstruction as well.

Extraction may occur within hours, but drying commonly takes several days. Complete recovery can take weeks or months when materials must be ordered, permits obtained, inspections completed, or hidden moisture investigated. Weather, contractor availability, contamination, and building design all affect the schedule.

When to Call a Flood Restoration Specialist

Professional help is warranted when there is standing water, sewage, widespread saturation, visible mold, electrical exposure, damaged ceilings, structural movement, or water inside walls and crawl spaces. DIY cleanup may be reasonable for a small, clean spill that is fully removed quickly; it is risky when contamination, concealed moisture, or demolition is involved.

Ask prospective contractors:

  • Are you available for emergency assessment, and who responds after hours?
  • What equipment will you use, and how will readings be documented?
  • Do you provide moisture mapping, daily monitoring, and a final drying report?
  • How will contaminated materials and debris be contained and disposed of?
  • Do you perform contents restoration, pack-out, storage, and reconstruction?
  • Which licenses, training, insurance, and safety programs apply to the work?
  • Will you coordinate documentation with the insurer without promising coverage?

The practical action path is straightforward: ensure everyone is safe, stop additional water only when it can be done safely, document the condition, notify the insurer, and arrange a qualified assessment. Prompt extraction and verified structural drying reduce secondary damage and give you a clearer basis for deciding what to clean, what to remove, and what to rebuild.


How to Prepare for Carpet Installation
Posted in

How to Prepare for Carpet Installation

Carpeting can add warmth to a room, and it also serves as an insulator and absorbs sound. Carpet is available in a variety of styles and colors, from bold patterns to more subdued hues.

Accurate measurements are important for a carpet installation, as well as proper preparation of the area to be covered. This will ensure that the carpet is cut and trimmed correctly, and minimize waste.

Preparation

A new carpet can add comfort and a touch of style to any room. However, it is important to ensure that it is properly installed for the best possible results. Hiring professional installers is the best option, as they have the training and experience to do the job correctly. Nonetheless, there are some things that you can do to prepare for carpet installation and to help the professionals work efficiently.

Companies like Ruby Design offer professional carpet installation services, helping clients choose the perfect carpet for their space. With experienced installers, they ensure precise fitting, high-quality results, and attention to detail. These services enhance the comfort, durability, and aesthetics of homes and businesses, providing lasting value and satisfaction.

The first step is to choose the type of carpet that you want. Consider factors such as foot traffic, color scheme, and surrounding decor when making this decision. You will also need to decide on a material and pile. For example, high-traffic areas will require durable, stain-resistant materials, while bedrooms may benefit from a soft, luxurious carpet.

Once you have selected your carpet, the next step is to clear and prepare the space for installation. This process involves removing furniture, cleaning the area and addressing any subfloor issues that might interfere with the success of your new flooring. It is also a good idea to trim baseboards and door frames, if necessary, in order to ensure that the carpet will fit correctly.

Vacuum the space thoroughly to remove any dirt and debris. This will help to improve the adhesion of the adhesive that will be used during the installation process. In addition, it is a good idea to remove pictures from the walls and other wall hangings that could get in the way during the installation. It is also a good idea to empty the contents of any closets that are to be carpeted, as well as to clean out any other storage spaces.

Before you purchase your carpet, draw a floor plan on graph paper, marking the exact position of doors, windows, radiators and any other wall interruptions. This will give you an accurate measurement of what you need, and it will make the selection process much easier.

Before the professional installers begin working, it is a good idea to open any windows and turn on any ceiling fans. This will help to circulate fresh air and disperse any material odors that might develop during the installation process. It is also a good idea to keep children and pets away from the installation area, as the noise and vibrations can be stressful for them.

Laying the Carpet

Once all the tack strips are in place and any gaps in the floorboards have been filled with wood putty or similar substance, it is time to start placing the carpet. It is recommended that you take a “selective” approach to the job and only lay carpet in areas where it will be needed, such as a living room or bedroom. This will make the installation process much easier.

Before you purchase your carpet, measure the area to be covered and draw a floor plan on graph paper with exact measurements of all walls, windows, fireplaces, radiators, doors and other wall interruptions. You can then take this plan with you to your carpet dealer so that you get the right amount of carpet and padding.

When the first strip of carpet is placed, it is important that its pile direction lines up with the pile of the other adjacent pieces. To determine the pile direction, look at the bottom of the carpet tile. There should be an arrow that indicates which way the fibers run. This is the direction that the carpet should be laid, and it should remain consistent throughout the job.

Next, cut a strip of carpet to the proper length and begin laying it. It is important that you work quickly, to prevent the carpet from becoming stretched or wrinkled. If necessary, use a knee kicker or a power stretcher to get the carpet tight and smooth. After the carpet is installed, a seam roller can be used to ensure that all of the seams are properly pressed down and sealed.

When it comes to a carpet installation, the devil is in the details. Frayed edges, crooked or loose corners and unattractive seams are all common problems that can be caused by a lack of professional installation. It is recommended that you hire a professional carpet installer for the best results. However, if you choose to tackle the project yourself, there are a few specialty tools that you will need. These tools are often available for rent at home centers or equipment rental yards. These include a tackless strip, a power stretcher and a knee-kicker.

Fastening the Carpet

Carpet installation is a time-consuming process that requires special skills and tools. To ensure quality work and a long-lasting floor, it’s best to hire a professional installer.

Before beginning the actual carpeting, the installer should lay down a layer of padding to keep the new material from pulling away from the subfloor. The padding can also help the carpet to absorb sound and moisture. The carpet should be trimmed to fit around radiators, doors, windows, and other obstructions. Once the padding is in place, a power stretcher and a knee kicker should be used to get the new material as tightly stretched as possible.

The installer should also install tackless strips along the perimeter of the room, except in front of doorways. The strips have angled pins that catch the back of the carpet and hold it in place. They should be spaced about half an inch apart and positioned with their pins facing toward the walls, so they grip the carpet properly.

Once the carpeting is cut and in place, the installer should nail the fastener strips to the floorboards. The nails should be nailed at least every 6 inches, depending on the size of the room and the thickness of the carpeting. It’s a good idea to use two rows of strips in areas with heavy traffic or when using certain types of carpets, like Berber.

After the fastener strips are in place, the carpeting can be laid over them. The installer should make sure to overlap the ends of each row to prevent gaps. He or she should then trim the edges of the carpeting, cutting it carefully around corners and making sure that they lie flat against the wall. The installer should also trim carefully around radiators and other obstacles, trimming the carpeting as closely as possible.

If there are seams between carpeting pieces, they should be joined together with seam tape. This is a specially made product that’s applied to the seams and then heated with an electric iron. The iron heats the adhesive on the tape, which causes it to seal. It’s important to follow the instructions on the seam tape precisely, or the seams may not fully seal.

Finishing the Job

Carpet installation is a complex job that involves many steps. It is important that you choose a professional installer who will perform the work to your satisfaction.

The best way to find a good contractor is to ask for references from friends and family who have recently had new carpet installed. Also, look at the quality of the work they have performed in other homes.

If you decide to hire a contractor, make sure the contract clearly states what the price is for the work and whether any additional charges will be made. It should also state who is responsible for fixing doors and floor molding, if necessary. It is also important to note that installing carpet requires a number of specialty tools, such as a seam iron, power stretcher, and knee kicker. These tools are typically available for lease or rent at home centers and tool rental yards.

Before the carpet installation begins, the floor should be cleaned and prepped. Any stains, holes, or bumps should be patched. This includes filling in any sunken spots and sanding down rough patches. You should also remove baseboards to expose the subfloor and check for any signs of moisture or damage to the wood.

Once the padding is installed, tack strips should be nail down along the perimeter of the room. The strips should be 1 inch wide, and they should run at least 4 inches up the wall. When trimming the carpet, it should be cut slightly larger than the dimensions of the room. This extra material will allow for proper stretching and tucking. The carpet should also be trimmed to fit under the curved tack strip at the doorway, which should be pressed down with a putty knife.

When the installer is done, they will clean up any debris from the job site and vacuum the area. They will then move your furniture back into place and ask you to walk through the room with them so that they can ensure all of the work is completed properly. The installer should also clean up and dispose of the old carpet. The final step is to have the carpet cleaned by a professional carpet cleaner, who will use hot water and cleaning solution to sanitize it. This will kill bacteria and odors and help the carpet look new.

Featured Image Source: https://rubydesign.uk/wp-content/uploads/2024/10/livingroom-carpets.jpg

How to Decorate the Home at Festivals
Posted in

How to Decorate the Home at Festivals

How to decorate a home at festivals is a dilemma that most people face. It is indeed a big issue and requires time, planning and enthusiasm to decorate your home according to the culture. The festival season which starts from mid-January to mid-February is one of the best time to get ready with the home decor. During this time you will find a large number of cultural events and parties in almost every city and town. Some of them may be good, while some are not so good. In such a case, how to decorate home at festivals becomes the important question.

First of all, we need to understand the culture of the place that we live. We cannot just decorate home according to our own preference. We need to understand the culture of the people living there. If you are living in New York, it is obvious that you will like something new look and feel. However, if you are living in some rural place, it will be very difficult for you to make your decoration style conform to the culture of that place.

So, how to decorate home at festivals like Halloween and New Year’s? You can decorate your home according to the theme of the occasion. For instance, you can decorate the home for Halloween with decorations of pumpkins. Similarly, you can decorate the home for New Year’s Eve celebration by using red color schemes and matching the decorations with the mood of that occasion.

Nowadays, many people are using the concept of interiors and exteriors. They try to make their home interiors similar to the exteriors. For instance, if you have a small kitchen, you can use modern appliances and furniture to make it look more spacious and better. Similarly, if you have a porch, you can decorate it by putting beautiful candles and flowers around it. Similarly, if you have a balcony, you can take the help of wind chimes and bamboo rods to make it look soothing.

In the recent times, the concept of aesthetics has become quite important when it comes to decorating a home. Many people are trying to create a different look and atmosphere in their home to make it look beautiful. If you are living in a rented home, you can always try to change the color scheme and use modern accessories to give a different feel. If you have a house in flat, you can make your living room look like studio and use some beautiful furniture with antique tables. Similarly, if you are living in an olden era house, you can decorate your house with authentic furniture and old-fashioned accessories.

Well, those are some of the things that you should keep in mind while planning how to decorate home at festivals. If you follow these tips carefully, you will be able to make your home a place that will be loved by all. Happy decoration!